メッシュ(Mesh)
メッシュとは
「立方体」「球」「円柱」etc.etc.。これらの頂点座標を1から自分で作成しても良いです。でも、こんな基本図形を毎度毎度作るなんてめんどくさいですよね?と言うわけでメッシュです。メッシュを使うと、あらかじめ作っておいた頂点バッファを一まとまりにして扱うことが出来ます。それと、もう一つ利点があってさっき言った基本図形はあらかじめ用意されているのです。
ソースコード
いきなりです。でも、メッシュは難しくないですよ。
using System;
using System.Drawing;
using System.Windows.Forms;
using Microsoft.DirectX;
using Microsoft.DirectX.Direct3D;

namespace Project2
{
    /// <summary>
    /// md3d2 の概要の説明です。
    /// </summary>
    public class md3d2:Form
    {

        public md3d2():base()
        {
            //最小サイズを設定
            this.MinimumSize=new Size(80,60);
            //ウィンドウの名前(かっこいいのを付けてあげてください)
            this.Text ="Direct3D-My";
        }

        private Device device_;
        private PresentParameters presentParam_;


        /// <summary>
        /// 立方体メッシュ
        /// </summary>
        private Mesh boxMesh_;

        /// <summary>
        /// Direct3Dの初期化を行います。
        /// </summary>
        /// <returns>初期化が成功したかどうか</returns>
        public bool DXInitialize()
        {
            try
            {
                presentParam_ = new PresentParameters();

                presentParam_.Windowed =true;
                presentParam_.SwapEffect = SwapEffect.Discard;

                device_ = new Device(0,DeviceType.Hardware,this
                    ,CreateFlags.HardwareVertexProcessing,presentParam_);


                //メッシュを作成
                creatMesh();

                return true;
            }
            catch
            {
                return false;
            }

        }


        /// <summary>
        /// メッシュを作成する
        /// </summary>
        private void creatMesh()
        {
            boxMesh_ = Mesh.Box(device_,2,2,2);
        }

        public void Render()
        {
            if(device_==null)return;
            if(this.WindowState ==FormWindowState.Minimized)return;

            //回転を行う
            //device_.Transform.World =
            //  Matrix.RotationY(Environment.TickCount /300f);


            //カメラの設定を行う
            device_.Transform.View = Matrix.LookAtLH(
                new Vector3( 5.0f, 5.0f, 5.0f ),
                new Vector3( 0.0f, 0.0f, 0.0f ),
                new Vector3( 0.0f, 1.0f, 0.0f ) );
            device_.Transform.Projection =
                Matrix.PerspectiveFovLH((float)Math.PI / 4,
                (float)this.ClientSize.Width / (float)this.ClientSize.Height,
                3.0f, 100.0f);

            //device_.RenderState.Lighting =false;

            //ライトの設定
            device_.Lights[0].Direction =Vector3.Normalize(new Vector3(-1,-2,-3));
            device_.Lights[0].Type = LightType.Directional;

            device_.Lights[0].Diffuse = Color.FromArgb(255,255,255);
            device_.Lights[0].Ambient = Color.FromArgb(40,40,40);

            device_.Lights[0].Enabled =true;
            device_.Lights[0].Update();


            //マテリアルの設定
            Material mat =new Material();
            mat.AmbientColor = new ColorValue(1.0f,1.0f,1.0f);
            mat.DiffuseColor = new ColorValue(1.0f,1.0f,1.0f);
            device_.Material = mat;


            device_.Clear(ClearFlags.Target,Color.Blue,1.0f,0);

            device_.BeginScene();

            boxMesh_.DrawSubset(0);


            device_.EndScene();

            try
            {
                //更新
                device_.Present();
            }
            catch(DeviceLostException)
            {
                resetDevice();
            }

        }

        /// <summary>
        /// デバイスのリセットを行う
        /// </summary>
        private void resetDevice()
        {
            int result;
            if(!device_.CheckCooperativeLevel(out result))
            {
                if(result ==(int)ResultCode.DeviceLost)
                {
                    //ちょっと待つ
                    System.Threading.Thread.Sleep(10);
                }
                else if(result ==(int)ResultCode.DeviceNotReset)
                {
                    device_.Reset(presentParam_);
                }
            }
        }
    }

    /// <summary>
    /// エントリクラス
    /// </summary>
    class Program
    {
        public static void Main()
        {
            using(md3d2 dxform =new md3d2())
            {
                if(!dxform.DXInitialize())
                {
                    MessageBox.Show("Diret3Dの初期化に失敗しました。"
                        ,"初期化の失敗");
                    return;
                }
                dxform.Show();

                while(dxform.Created)
                {
                    dxform.Render();
                    Application.DoEvents();
                }
            }
        }
    }
}
メッシュの作成
「Mesh」というクラスは「baseMesh」というクラスを継承しています。そして、メッシュを扱うための機能のほとんどはBaseMeshの方にありますので、ヘルプを見るときは注意してください。
それではメッシュの作成です。今回は立方体を作りたいので、「Mesh.Box()」を呼び出します。
public static Mesh Box(
    Device device,
    float width,
    float height,
    float depth
);
このメッシュの中心は原点座標にあります。ですので、座標は(±X/2 ,±Y/2 ,±Z/2 )になります。つまりそれぞれの長さの半分です。
public void DrawSubset(
    int attributeID
);
intの値の使い方は詳しくは知りません。ざっと調べたところによると、メッシュはいくつかの部分を組み合わせる事で出来ているらしいです。そのため、どの部分を描画するのかを指定しなければいけないらしいのです。幸い立方体は1つの部分で作ってあるらしく(保証はありません)、「0」番を指定すると全部描いてくれます。
今回は調子に乗ってもう一つ改造を施してみましょう。これは前回まででも出来たことですが、同じ頂点座標を使って複数の物体を描くことが出来ます。どういう事かというと、あのワールド変換を使うのです。
「Matrix.Translation(float X,float Y,float Z)」は移動を行うことが出来ます。移動はそれぞれの軸に平行に行われます。それと、「Matrix.Identity」は変換を行わない行列です。(分かる人に言うと、単位行列です)
        public void Render()
        {
            if(device_==null)return;
            if(this.WindowState ==FormWindowState.Minimized)return;

            //カメラの設定を行う
            device_.Transform.View = Matrix.LookAtLH(
                new Vector3( 5.0f, 5.0f, 5.0f ),
                new Vector3( 0.0f, 0.0f, 0.0f ),
                new Vector3( 0.0f, 1.0f, 0.0f ) );
            device_.Transform.Projection =
                Matrix.PerspectiveFovLH((float)Math.PI / 4,
                (float)this.ClientSize.Width / (float)this.ClientSize.Height,
                3.0f, 100.0f);

            //device_.RenderState.Lighting =false;

            //ライトの設定
            device_.Lights[0].Direction =Vector3.Normalize(new Vector3(-1,-2,-3));
            device_.Lights[0].Type = LightType.Directional;

            device_.Lights[0].Diffuse = Color.FromArgb(255,255,255);
            device_.Lights[0].Ambient = Color.FromArgb(40,40,40);

            device_.Lights[0].Enabled =true;
            device_.Lights[0].Update();

            //マテリアルの設定
            Material mat =new Material();
            mat.AmbientColor = new ColorValue(1.0f,1.0f,1.0f);
            mat.DiffuseColor = new ColorValue(1.0f,1.0f,1.0f);
            device_.Material = mat;


            device_.Clear(ClearFlags.Target,Color.Blue,1.0f,0);

            device_.BeginScene();

            device_.Transform.World = Matrix.Identity;

            boxMesh_.DrawSubset(0);

            mat.AmbientColor = new ColorValue(0.0f,1.0f,1.0f);
            mat.DiffuseColor = new ColorValue(0.0f,1.0f,1.0f);
            device_.Material = mat;

            device_.Transform.World = Matrix.Translation(0,0,-3);

            boxMesh_.DrawSubset(0);

            device_.EndScene();

            try
            {
                //更新
                device_.Present();
            }
            catch(DeviceLostException)
            {
                resetDevice();
            }

        }
これでできあがりです。早速実行してみましょう。

なんか変ですね・・・。実はこれ、物体の正確な前後判定を行っていないからなのです。DirectXにはこれを簡単に行ってくれる機能があるのですが、今回はもっと単純に行きましょう。
つまり、前に表示されるべき物体は、上書きすればいいのだから、あとから描画すればいいのです。そういうわけで、入れ替えます。
        public void Render()
        {
            if(device_==null)return;
            if(this.WindowState ==FormWindowState.Minimized)return;

            //カメラの設定を行う
            device_.Transform.View = Matrix.LookAtLH(
                new Vector3( 5.0f, 5.0f, 5.0f ),
                new Vector3( 0.0f, 0.0f, 0.0f ),
                new Vector3( 0.0f, 1.0f, 0.0f ) );
            device_.Transform.Projection =
                Matrix.PerspectiveFovLH((float)Math.PI / 4,
                (float)this.ClientSize.Width / (float)this.ClientSize.Height,
                3.0f, 100.0f);

            //device_.RenderState.Lighting =false;

            //ライトの設定
            device_.Lights[0].Direction =Vector3.Normalize(new Vector3(-1,-2,-3));
            device_.Lights[0].Type = LightType.Directional;

            device_.Lights[0].Diffuse = Color.FromArgb(255,255,255);
            device_.Lights[0].Ambient = Color.FromArgb(40,40,40);

            device_.Lights[0].Enabled =true;
            device_.Lights[0].Update();

            //マテリアルの設定
            Material mat =new Material();

            device_.Clear(ClearFlags.Target,Color.Blue,1.0f,0);

            //シーンの開始
            device_.BeginScene();

            //色設定
            mat.AmbientColor = new ColorValue(0.0f,1.0f,1.0f);
            mat.DiffuseColor = new ColorValue(0.0f,1.0f,1.0f);
            device_.Material = mat;

            //変換設定
            device_.Transform.World = Matrix.Translation(0,0,-3);

            //描画(後ろのオブジェクト)
            boxMesh_.DrawSubset(0);


            //色設定
            mat.AmbientColor = new ColorValue(1.0f,1.0f,1.0f);
            mat.DiffuseColor = new ColorValue(1.0f,1.0f,1.0f);
            device_.Material = mat;

            //変換設定
            device_.Transform.World = Matrix.Identity;

            //描画(前のオブジェクト)
            boxMesh_.DrawSubset(0);

            device_.EndScene();

            try
            {
                //更新
                device_.Present();
            }
            catch(DeviceLostException)
            {
                resetDevice();
            }

        }
移動設定だけでなく、マテリアルの設定も入れ替えて下さいね。そうすると、次のようになります
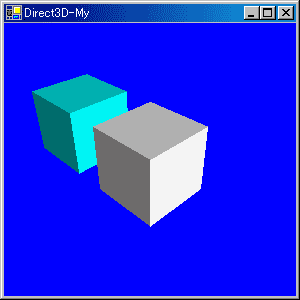
これで完成。
今回も長くなりました。他にも標準で使えるメッシュがありますが、それはTipsの方で紹介します。
次回の内容はまだ決めていません。何にしましょうか?(そろそろZバッファでもやった方が良いですか?)
ページの一番上へ
前のページへ 一覧に戻る 次のページへ
- 質問から意見、誤字訂正まで気軽に連絡してください。
- こちらに掲示板も用意しています。「プログラム掲示板」
- リンクに関してはご自由にどうぞ。
- 書いてある情報については、特に断り書きがない限り自由に使ってください。そのまま転載しても、書き換えたりして再利用してもかまいません。