テクスチャ(Texture)
今回は前回まで流れを無視してテクスチャであります。ライト、マテリアル、メッシュ。いっさい使いません。
テクスチャとは「質感」のことですね。ですが、DirectXでは質感と言うよりは表面に貼り付ける絵のことをさします。要するに今回は、前まで作った3Dオブジェクトに読み込んだ絵を貼り付ける。と言う内容です。
テクスチャの座標系
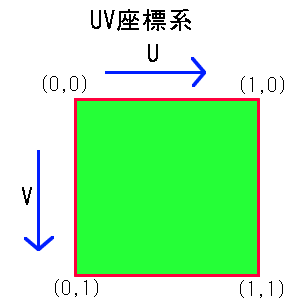
パソコンの中で絵の大きさは大抵ピクセルを用いて「縦???ピクセル、横???ピクセル」と言うように表しますよね?ですがテクスチャは「UV座標」と呼ばれる特殊な座標で表します。
「u」は横方向、「v」は縦方向の値になります。これを間違えると画像が90度回転してしまうのでしっかり覚えておきましょう。
UV座標の中では絵のサイズは常に「1×1」になります。ですから中心の座標は(0.5,0.5)となります。

上はこれらのことを図にまとめた物です(絵心が無くてすいません)。
ソースコード
ファイル名は適当に変えちゃって下さい。
using System;
using System.Drawing;
using System.Windows.Forms;
using Microsoft.DirectX;
using Microsoft.DirectX.Direct3D;

namespace Project2
{
    /// <summary>
    /// md3d2 の概要の説明です。
    /// </summary>
    public class md3d2:Form
    {

        public md3d2():base()
        {
            //最小サイズを設定
            this.MinimumSize=new Size(80,60);

            this.Size = new Size(300,300);

            this.Text ="Direct3D-My";
        }

        private Device device_;
        private PresentParameters presentParam_;


        /// <summary>
        /// Direct3Dの初期化を行います。
        /// </summary>
        /// <returns>初期化が成功したかどうか</returns>
        public bool DXInitialize()
        {
            try
            {
                //プレゼンテーションパラメータを作成
                presentParam_ = new PresentParameters();

                //ウィンドウモード
                presentParam_.Windowed =true;

                //スワップエフェクトを設定。
                presentParam_.SwapEffect = SwapEffect.Discard;

                //デバイスを作成
                device_ = new Device(0,DeviceType.Hardware,this
                    ,CreateFlags.HardwareVertexProcessing,presentParam_);

                creatVertex();

                creatTexture();

                //初期化成功
                return true;
            }
            catch
            {
                //初期化失敗
                return false;
            }

        }

        /// <summary>
        /// 頂点バッファ
        /// </summary>
        private VertexBuffer vertexBuffer_;

        /// <summary>
        /// 頂点バッファ作成関数
        /// </summary>
        private void creatVertex()
        {
            //頂点バッファ領域を確保
            vertexBuffer_ = new VertexBuffer(
                typeof(CustomVertex.PositionTextured),4, device_
                , 0, CustomVertex.PositionTextured.Format, Pool.Managed);

            //頂点データの配列を作成
            CustomVertex.PositionTextured[] verts =
                new CustomVertex.PositionTextured[4];

            //頂点データ
            verts[0].Position  =new Vector3(1, 1,0);
            verts[0].Tu = 0; verts[0].Tv =0;

            verts[1].Position  =new Vector3(-1, 1,0);
            verts[1].Tu = 1; verts[1].Tv =0;

            verts[2].Position  =new Vector3(1, -1,0);
            verts[2].Tu = 0; verts[2].Tv =1;

            verts[3].Position  =new Vector3(-1, -1,0);
            verts[3].Tu = 1; verts[3].Tv =1;

            //バッファをロック
            GraphicsStream stm = vertexBuffer_.Lock(0,0,0);

            //頂点データをバッファに書き込み
            stm.Write(verts);

            //バッファのロックを解除
            vertexBuffer_.Unlock();
        }

        /// <summary>
        /// テクスチャ
        /// </summary>
        private Texture texture_;

        /// <summary>
        /// テクスチャの初期化と読み込み
        /// </summary>
        private void creatTexture()
        {
            //テクスチャのパス
            string openTexture
                = @"H:\Documents and Settings\All Users\"
                + @"Documents\My Pictures\Sample Pictures\"
                + @"Blue hills.jpg";

            //テクスチャをファイルから読み込み
            texture_ = TextureLoader.FromFile(device_ ,openTexture);

        }


        public void Render()
        {
            if(device_==null)return;
            if(this.WindowState ==FormWindowState.Minimized)return;

            //回転を行う
            device_.Transform.World =
                Matrix.RotationY(Environment.TickCount /1500f);

            //背面カリング無し
            device_.RenderState.CullMode = Cull.None;

            //カメラの設定を行う
            device_.Transform.View = Matrix.LookAtLH(
                new Vector3( 0.0f, 0.0f, 3.0f ),
                new Vector3( 0.0f, 0.0f, 0.0f ),
                new Vector3( 0.0f, 1.0f, 0.0f ) );
            device_.Transform.Projection =
                Matrix.PerspectiveFovLH((float)Math.PI / 4,
                (float)this.ClientSize.Width / (float)this.ClientSize.Height,
                0.0f, 100.0f);

            //ライティング無し
            device_.RenderState.Lighting=false;

            device_.Clear(ClearFlags.Target,Color.Blue,1.0f,0);

            device_.BeginScene();

            //テクスチャをセット
            device_.SetTexture(0,texture_);

            device_.SetStreamSource(0,vertexBuffer_,0);
            device_.VertexFormat = CustomVertex.PositionTextured.Format;
            device_.DrawPrimitives(PrimitiveType.TriangleStrip,0,2);

            device_.EndScene();

            try
            {
                //更新
                device_.Present();
            }
            catch(DeviceLostException)
            {
                resetDevice();
            }

        }

        /// <summary>
        /// デバイスのリセットを行う
        /// </summary>
        private void resetDevice()
        {
            int result;
            if(!device_.CheckCooperativeLevel(out result))
            {
                if(result ==(int)ResultCode.DeviceLost)
                {
                    //ちょっと待つ
                    System.Threading.Thread.Sleep(10);
                }
                else if(result ==(int)ResultCode.DeviceNotReset)
                {
                    device_.Reset(presentParam_);
                }
            }
        }
    }

    /// <summary>
    /// エントリクラス
    /// </summary>
    class Program
    {
        public static void Main()
        {
            using(md3d2 dxform =new md3d2())
            {
                if(!dxform.DXInitialize())
                {
                    MessageBox.Show("Diret3Dの初期化に失敗しました。"
                        ,"初期化の失敗");
                    return;
                }
                dxform.Show();

                while(dxform.Created)
                {
                    dxform.Render();
                    Application.DoEvents();
                }
            }
        }
    }
}
テクスチャの作り方
今回はファイルからということで、「TextureLoader.FromFile」というメソッドを使っています。デバイスとファイル名を渡すとテクスチャを作ってくれます。デバイスが必要になるのでデバイスの作成が終わってから行います。
テクスチャ座標の指定
今回は4つの頂点で作られる1つの平面へテクスチャを貼り付けます。今回用いる頂点バッファの型は「PositionTextured」というものです。3次元の「Position」の他に「Tu」「Tv」というテクスチャ座標が表示できるようになったものです。
前に言ったように、Tu,Tvの範囲は0~1です。
描画
描画時の設定は1つだけです。
テクスチャは1枚だけとは限りません。何枚かを重ねたり、そのほかの利用方法もあったりします。そのため、ステージというものを設定します。といっても今回は1枚だけですので0番を指定して下さい。
その他の設定
カメラ、ワールド変換、ライティング無しの宣言、カリングモードのオフを行います。分かる方は自分で設定をいじると楽しいでしょう。
今回もソースは長いですが内容はさらっとです。出来る方は立方体へのテクスチャ貼り付けを行ってみて下さい。
ページの一番上へ
前のページへ 一覧に戻る 次のページへ
- 質問から意見、誤字訂正まで気軽に連絡してください。
- こちらに掲示板も用意しています。「プログラム掲示板」
- リンクに関してはご自由にどうぞ。
- 書いてある情報については、特に断り書きがない限り自由に使ってください。そのまま転載しても、書き換えたりして再利用してもかまいません。